"Vino" Italian Vintners Painting 4/2013
Decided to do a painting to go on the wall behind the wine booth at our Church/School auction "An Evening in Tuscany". Decided on a 4'X4' canvas and used a soft yellow background.
It looks so much darker in the beginning picture, in contrast to the white canvas. Here it is ready to be textured. There are so many different ways to texture; you can use paper towels, sponges, waxed paper, plastic wrap...and I've used all of those.....so, I decided to try something different.
I had a lot of old terry cloth washcloths that I use for cleaning. They have to be clean first and mine were. I added white to the background yellow to make it a shade lighter. I folded the edges of the terrycloth washcloth back and held them together in my hand. I dipped the rounded remaining fabric lightly into the paint and 'pounced' it on some waxed paper, I had taped to the table top, to remove the excess paint.
Starting in one of the upper corners I gently 'pounced' the washcloth onto the canvas, lifted it completely off the canvas and rotated it a little and pounced again, slightly overlapping the first application. (You use sponges the same way)
Don't ever rotate the cloth when it is on the canvas, that would make a round circular mess. always lift it away and off before turning left or right and pouncing again. By 'poucing' I mean that you gently hit the canvas with the paint covered cloth, but don't push clear to the canvas.
If you ever do this, practice on a piece of painted cardboard first. I had to change out the rag at least six times for this size canvas. I found that if I tried to do too much the cloth becomes saturated with paint and you lose the 'terrycloth texture' that looks so nice on the canvas. Try this, it's really fun! (example below)
Here's the finished canvas after texturing it with terrycloth washcloths. I really liked it!
Here is a close up of the terrycloth texturing . It looks similar to marble. And adds a lot of interest to a painting.
I began by doing a transparent side load of color for the 'ground' under the figures. I then began to base coat the clothing and the cork for the wine bottle. Italian flag colors, of course!
I painted the wine in the bottle and shaded at the bottom and gave it some highlights on the top. Based the cork and added the shading, highlight and details. Remember the cork is smaller than the bottle because the glass will go around it. the glass is done with a green transparent side load, letting each section dry before doing the glass lip at the top. Love painting glass!
Here's a close up of the cork and wine bottle. I painted the bottle holder while the wine and glass were drying, when everything was dry I painted the rim of the bottle holder that covered up the bottom of the wine area.
Italian Vintner on the left. Dressed in his Italian garb.
Italian Vintner on the right, all decked out and helping to transport the 'Vino' to the celebration.
Close up of the shorts, cumberbund, shirt and vest. I work from back to front. Base in the main color, then when dry, do a transparent side load of darker shading color and highlight where needed.
The Vintner's socks and shoes, they could be any color. Detail makes it interesting, adding line work, wrinkles in the socks, shine marks on the shoes, small splashes of ground color with an old blown out flat brush, stipple it on.
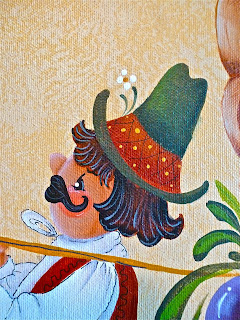
Close up of the face, hat and hair. Add lots of detail. Dots are one of my favorites! On the hat, for the buttons and to form the petals on the flower.
Time for breakfast before going to the studio to paint...oh...the dining room IS the studio. lol When I have large projects we get a few feet of space for eating at the table.
Don't think this is all I ever do; I also have laundry, dusting, vacuuming, cleaning toilets, tubs, sinks, cooking, shopping, paying bills, watching our grandchildren, washing floors, working in the yard, singing in the choir at church, setting up and refreshing communion at church and keeping in touch with our six children and 10 grandchildren. But if I didn't fit some art work in here and there I would never be as good at everything else. God is good!
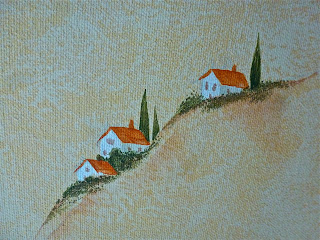
Put a few little house up on the hill on the outskirts of the picture.
Some more went on the other side of the canvas too. Can you see them in the picture below. they were probably about a half inch tall. So much fun to do, just a couple of strokes with a flat brush for both the house and the roof....and....there are those Cypress trees again, my favorites!!
We're 'gettin er' done!' as Larry the Cable Guy would say. Now we're painting 'one stroke' grapes. So much fun and they're done so quickly. The only thing you have to keep in mind is to always do the ones that are 'behind' first. I always number them on the pattern I draw so I won't forget.
Aren't they pretty? And they give the painting some real 'pop'. I mix a dark blue and also a dark purple (I like the purple more blue than red. I load a flat brush (the size depends on how big you want the grapes to be) I used a size 8 for these.
I load the brush with the dark blue or purple, depending on which color you want to paint next. I pick up some white on one of the tips and then, laying the brush flat, I drag in short strokes, staying in one place, to blend the white into the blue or purple. That's what makes them lighter on the outside edges.
I place the white side at the top of the grape, flatten and rotate the brush in a circle, holding the brush in one place (the brush should rotate in a circle to form the grape. Work from underneath to the top grape. For the shine I used a smaller flat brush and white, wiped off the excess paint (don't want a blog) and lightly hit each grape in the highlight areas.
The leaves are strokes using a flat brush (Folk Art style) then I added some small twirly vines using a fully loaded liner brush with paint the consistency of India ink. Use only the tip of the brush for these, rest your hand across the wrist of the other one if necessary to keep from pushing down and making the lines too thick.
Close up of the purple and blue grapes, you can also make light green ones the same way. They look especially nice on the textured background.
The finished 'Vino" painting. When I finished I thought it looked too blank towards the bottom so I taped (using painters tape) off a small section and painted it the dark blue and purple mixed together at the bottom and part way up the sides. It looked more finished.
A couple who makes their own wine bought the painting at auction and hung it above their wine bar.


